Converting WordPress to HTTPS
Last month, Google emailed a warning to website owners that, starting in October 2017, Google Chrome would begin marking any page with a form as “not secure” if your site was not protected with SSL. Despite knowing all the benefits to converting to HTTPS, I hadn’t moved my own site there as I am kept busy with client work and I’d be lying if I didn’t say I hold slight concern over how long Google rankings might fluctuate with the change. For every story about the people who gained traction after converting to HTTPS, you read one about how it ruined someone’s life (likely because they did something wrong in the switch, but still.)
However, I decided I had procrastinated on biting the bullet here long enough so I got to work. Here is what I did:
Installed SSL certificate
Let’s Encrypt offers free SSL certificates and many hosts have it integrated now to where you can easily add Let’s Encrypt certificates. It took me less than two minutes to install one on my server. The only downside to these certificates is they have to be renewed frequently. However, they’re completely free and it’s an awesome service. Learn more about Let’s Encrypt by clicking here.
Tested HTTPS version
I made sure I could access my site address over https, which I could. I then proceeded to test each page of my site to make sure, not only was it pulling over HTTPS, but I was getting a green lock on each page, meaning I wasn’t getting any mixed content warnings. Some items I did have to fix in order to clear pages to get the green lock: Google Fonts wasn’t pulling over https globally and a couple sidebar ads on my blog were using http vs. https. Learn more about preventing mixed content by clicking here. Also, a good service for finding what’s causing the issue is Why No Padlock?
Switched WordPress site address and WordPress address to HTTPS
This is done under Settings > General. Do not make this change without testing your URLs over HTTPS first.
Set up 301 redirect from HTTP to HTTPS
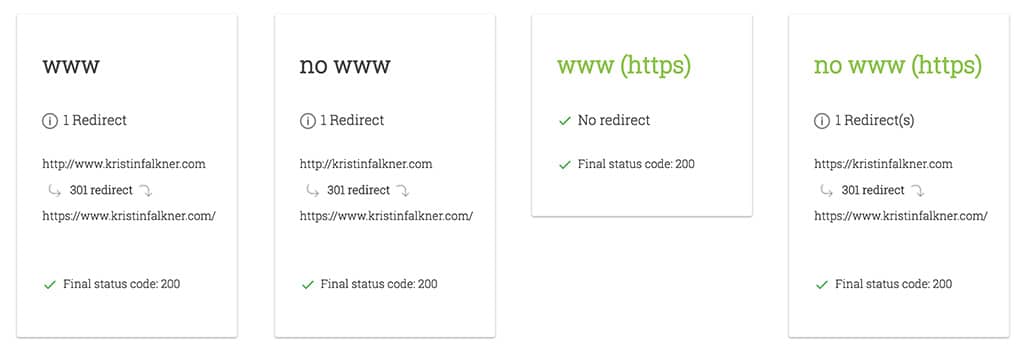
I did this via my htaccess file. What exactly you put here depends on your server but this article may be helpful. I managed to accidentally cause a redirect loop here initially but I was able to right the ship. I then tested to make sure if I accessed a non-HTTPS version, I was being redirected. I then tested my redirects with a redirect mapper like this one to make sure that (a) there were 301 redirects where there needed to be and (b) nothing was hopping more than once. I had an issue with the second one as my non-WWW, non-secure URLS, like kristinfalkner.com were first redirecting to www.kristinfalkner.com then www was hopping to the HTTPS www. You always want to minimize redirects. I had to hunt down where I had configured the initial non-www to www redirect (it was through my host directly) and disable it and make sure non-WWW now hopped straight to HTTPS www, which it did, as you can see via the screenshot.
Changed Internal Links to HTTPS
I did this running a couple queries on my database. These are the SQL queries I ran. Note: Always back up your database before making any changes. Also, if your WP database uses a prefix instead of just “wp_”, which mine does, you wouldn’t run these queries exactly, you’d replace “wp_posts” and “wp_postmeta” in them with “yourprefix_posts” and “yourprefix_postmeta”, subbing out whatever your actual database prefix is for “yourprefix”
UPDATE wp_posts SET post_content = REPLACE (post_content, 'http://www.kristinfalkner.com', 'https://www.kristinfalkner.com');
UPDATE wp_postmeta SET meta_value = REPLACE (meta_value, 'http://www.kristinfalkner.com','https://www.kristinfalkner.com');
Checked XML Sitemap URLS
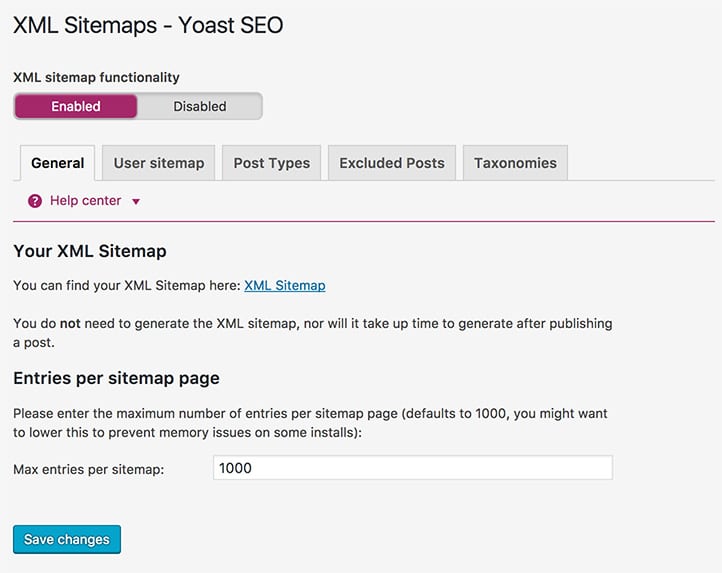
I personally use Yoast SEO to generate XML sitemaps for my site. I took a look at my sitemap and it still had all of my old HTTP URLs. Disabling the XML sitemap within the plugin under SEO > XML Sitemaps and then re-enabling it caused my sitemap to be generated with the correct HTTPS URLs.
TIP: If you don’t see XML Sitemaps under SEO in your admin and you’re running Yoast, you may need to ensure Advanced Settings is enabled within the Features tab under SEO > Dashboard.
Changed to HTTPS in Google Analytics
Within my Google Analytics account, I changed the default URL to the https version under Property Settings. There is a screencast here to refer to, but it’s a simple dropdown with http/https.
Added HTTPS in Google Webmaster Tools
What Google Analytics makes easy, Google Webmaster Tools does not. It would be nice if it was a comparable process but instead you need to add the new HTTPS URLs (non-www and www) as new properties. I also verified ownership of the HTTPS versions. Learn more on how to add new properties and verify ownership by clicking here.
Submitted New HTTPS Sitemap through Google Webmaster Tools
Using this link, I submitted the new HTTPS sitemap to Google under the HTTPS property I had added.
Submitted HTTPS Sitemap through Bing Webmaster Tools
I also submitted the same HTTPS sitemap through Bing Webmaster Tools.
Changed All Accessible External URL Links
Anywhere I knew my site was linked that I had access to, from my Twitter profile to Facebook to other third party sites I knew were linking my address, I changed the URL to use HTTPS.
Waiting Game
I think I covered most of my bases so I’m hoping, other than some temporary volatility, my rankings will stay steady, if not improve from the switch. Only time will tell there.